Thursday, September 29, 2011

Raspberry Coulis

Raspberry Coulis

This is an easy peasy recipe that can be used over pancakes (Trader Joes Multigrain Pancake mix), as cake fillings, in pies, as ice-cream toppings, on yogurts and parfaits –
I made this with an intention to use in a tart recipe, but the yield with a 12 ounce box was not much we ended up using it over pancakes – trust me when I say it was terrific!

Here is the recipe
12ounce box of fresh raspberries
1/4 cup of sugar
2tbsp honey
1tbsp Lemon juice (not required it you like to err on the side of sweet over tart)
Raspberry Coulis

Preparation
Blend the raspberries
In a tsp of water, mix the sugar in a saucepan and heat to liquefy
Add the honey and the raspberry puree
Allow it to bubble before turning off
Add the lemon juice and stir in
Set in refrigerator to cool and thicken

Use as needed

 Sending this off to Smitha's Berry Event


Wednesday, September 28, 2011

Couscous Idlis for Blog Hop Wenesday

couscous Idlis
Add caption
This Blog Hop Wednesday, a wonderful event started by Radhika of Tickling Palates, is a wonderful way to interact with our fellow bloggers and browse their each others blogs in greater details and in a more systematic way – On one such quest, I had the greatest pleasure to go through Harini’s Blog – Tamalapaku – the name was unique and I googled it to find that it meant betel leaves – something many Indians have after a satisfying meal to help with digestion – and the recipes I saw in her blog always erred on healthy which is what my blog mantra is too and I loved the many uses of grains and lentils. I was not sure which one to go with, but I did settle on something that I’ve been cooking with more recently – couscous – you many recall the couscous salad that I posted not too long ago – so my pantry has a full supply of this – And to make our South India charmer Idlis with it was like the best of both worlds for me –as in cooking with couscous and using it for a traditional recipe.
couscous idlis

Many Many thanks to you Harini for introducing me to these idlis, they were soft, spongy and incredibly tasty and will be a staple at our home now.  And this was the most pleasurable time because my newly turned 3yr old helped me with the whole process J
The original recipe is here - I doubled the quantities to serve my family of 5


Here is my version with a few slight changes

Ingredients - 
To make for a family of 4 or 6

1 cup of couscous
1cupof sooji
2 cups of yogurt +2 tbsp of buttermilk
Carrots & cilantro finely chopped/grated 1 cup
Dried Nuts Coarsely Chopped 3 Tbsp (I used peanuts, almonds and cashews)
1 green chili
Baking Soda 1.5 tsp
Salt as per taste
Turmeric 1/4 tsp
Olive Oil 1 tsp
Curry leaves, cumin and mustard seeds, urad dal with a pinch of asafetida for tempering

Preparation

Mix the sooji and the couscous in a wide mouthed dish
Add the baking soda and salt and mix into dry batter
Crush the nuts and add and mix in
Add the grated carrots raw (I did not cook it like the original recipe calls for)

Crush cilantro
Add about 1tsp of salt
Now add the yogurt and mix in well
Temper the mustard seeds, cumin, urad dal, chili and the asafetida and some roughly torn curry leaves
Add this to the batter and mix in well

Spray your idli plates with non-stick olive oil or other and steam idlis for 10-12 minutes – that’s all it took for me

Healthy, hearty and delicious idlis good to go J
shrey couscous

Couscous idlis


couscous idlis


For those of you who missed the blog anniversary giveaway post, it's not too late - please click here 

Saturday, September 24, 2011

Now Serving Turns One Today with A Giveaway Bonanza

Now Serving exciting times folks (: My blog is one year old fledgling now. I want to humbly thank everyone who has been visiting me without fail and leaving encouraging comments that really make this blog even more worthwhile to write, even if sometimes it seems like a full-time job (: From the bottom of my heart, I say “ thank you and please keep coming back…

I am thrilled to announce some giveaways at my blog what I like to call the October sweepstakes

There are 7 gifts to giveaway
5 for US residents (exclusively)
3 For Canadian Residents (of the 5 above)
2 For all others

I am happy to announce that Pasta Prima has most graciously offered several exciting giveaways to mark this milestone on my blog – The bummer is that this giveaway is only for my US & Canada audiences. This is simply because they are perishable items or too heavy to consider shipping to far away places.
A little about my Giveaway Sponsors
Those who have visited my blog in the past year know that more often than not I am constantly striving to promote healthy eating habits by providing healthier options for otherwise caloric and unhealthy food.  We are all given to breaking this rule and I am no exception J. If you visit their site, you will see that they take pride in making their pastas as natural as possible and in the most energy efficient ways possible by using green energy. They are also tuned into community causes and currently Breast Cancer Awareness, and giving back to the community. So this company in my books, is a winner all the way :) They seemed genuinely sorry that they could not extend their giveaways to countries beyond the US, BUT

WAIT! I have two incredible books that will be given away to my friends anywhere else in the world besides US or Canada.
Celebrated Chef, Madhur Jaffrey’s Eastern Vegetarian Cooking
And NY Times Best Seller, The Sneaky Chef, by Missy Chase Lapine

Here are the giveaways from Pasta Prima
US residents Exclusive
2 lucky winners win 3 Pasta Prima Ravioli flavors shipped directly to your home (US only, we are perishable!)
US & Canada 
3 lucky winners win a pasta bowl each
**Plus a coupon for free Pasta Prima Ravioli for US Residents only
 You can find Pasta Prima on FB
Pictures of the giveaways below
Pasta Prima giveaway


serving bowl blogger giveaway-1


Here are the rules of the Cookbook Giveaways

Exclusively for friends living OUTSIDE the US or Canada


Please this blog via Google Connect or Networkblogs and let me know through which medium you are following my blog – much appreciated J


Important Note: Be sure to checking your Google connect follow is set to “Public” not private or anonymous!

All participants in this giveaway should “Like” my FB page either by clicking on the box on the right column or by visiting my Facebook page – Much appreciated J

Leave a comment about my blog or the giveaways stating where you are from this is important – Much appreciated J

You should be contactable – So if you are a non-blogger be sure to drop me a line at priyamahadevan@hotmail.com - Pictures of the giveaways below


For my friends in US & Canada
Join this blog via Google Connect or Networkblogs and let me know in your comment through which medium you are following my blog Much appreciated :)

Important Note: Be sure to checking your Google connect follow is set to “Public” not private or anonymous! “visibly”following through one of these mediums,

All Participants should “Like” my FB page either by clicking on the box on the right column or by visiting this link. Much appreciated J

Like Pasta Prima’s FB page by clicking here

Leave a comment about my blog or the giveaways stating where you are from this is important

   You should be contactable – So if you are a non-blogger, drop me a line at priyamahadevan@hotmail.com


Look forward to your comments, continued support & participation
LOVE you and please continue coming over -Cannot say it enough! Always a pleasure to have your here :)!

Thursday, September 22, 2011

Celebration Begins With ... A Rainbow Cheesecake

Cheesecake
Rainbow Cheesecake
The minute I saw this, I knew I had found the perfect recipe for my baby’s birthday and the perfect post for the day – Now I am not too sure how much of this my little 3 yr. old will consume, but a challenge was what I was seeking, esp. since it is also close to my blog’s 1st anniversary (Please stay tuned on Sept 24th for many wonderful giveaways) I figured it doubled the cause for celebration – I was anxious about making this on my own – So I called upon my dear and sweet friend to ask if she would help me with it – The artist that she is, she was immediately enthused by the challenge and the idea of mixing the colors of the rainbow just right and together we had plenty of fun making this! This is truly a recipe that you would find a LOT easier to make with a friend, daughter or mother because it can be a little overwhelming! Grazie mille, Fla, may not have attempted it without your help and nifty guidance!
This cake contains more fat calories than I can count, but hey, when has there ever been a celebration without a good bit of fat to cheer us up! It also goes against most of the things I strive towards –aka – healthy recipes, but a sliver thin slice would be perfectly ok! So let’s chill on this subject :)

I got my recipe from Macheesmo - I have copied almost verbatim his ingredients and his method of preparation -  Hope you enjoy my pictorial of it so that it will be easy for you to recreate! Enjoy mes amies!
Rainbow Cheesecake

Ingredients
2 Cups graham crackers, crushed (crust)
2 Tablespoons sugar (crust)
6 Tablespoons unsalted butter (crust)
1/2 Teaspoon Cinnamon (crust)
1 Pinch Salt (crust)
2 Pounds Cream cheese, room temp
1 1/3 Cups Sugar
2 Teaspoons Vanilla
4 Large Eggs
1Cup Sour Cream
1Cup Heavy Cream
1 Pinch Salt
1 Container Food colors (blue, yellow, green, red)

Rainbow cheesecake


Preparation
  1. Before you get started with the crust, make sure your spring form pan is watertight. I do this by carefully wrapping a few layers of foil on the outside of the pan, working in both directions so water cannot get into the pan. Be careful not to rip the foil or water will get into your cake and ruin it!
  2. To make the crust, grind the graham crackers in a food processor until very fine. Then mix crushed crackers, salt, sugar, and cinnamon together in a bowl. Then mix in butter with your clean fingers.
  3. Press all but a few tablespoons of the graham cracker mixture into the prepared spring form pan. (Save a bit of the crust mixture in case there are holes later) Press it down firmly in the pan. I like to use a measuring cup for this to make it easy to get around the edges. You should have an even, flat crust.
  4. Bake the crust in a pre-heated 350 degrees oven for 10 minutes on a low rack. Remove from the oven and cool completely before continuing. Turn oven temp down to 325.
  5. To make filling, cut cream cheese into pieces and add to a mixing bowl. Whip until smooth, maybe 4 minutes. Then add sugar and continue to beat until smooth again, another 4-5 minutes. Next, add salt, vanilla, and one egg at a time, beating briefly between each egg. Finally, beat in the sour cream and heavy cream.
  6. Once the mixture is well combined and very smooth, divide it into 6 dishes. Add food coloring to each dish to get the desired colors.
  7. Pour colored mixtures into prepared dish with cooled crust. Start with red and pour it right in the center. Continue to build the rainbow by pouring the fillings directly in the center. This will create layers so that each slice has some of each color.
  8. Place cheesecake into a baking dish a fill with boiling water about 1 inch up the side of the spring form pan (pray that your dish is waterproof).
  9. Bake at 325 degrees in the water bath for one hour and 45 minutes.
  10. Turn off the oven, crack the door to the oven, and let the cake cool in the oven for one hour. The slow cooling will help it not crack.
  11. Then loosely wrap the dish in foil so the foil isn't touching the top of the cake and refrigerate for at least 4 hours.
  12. When ready to remove cake, run a clean narrow knife around the edge of the dish, remove the foil, unlock the spring, and carefully lift off the outer ring.
rainbow Cheesecake 2
First steps of preparation

Cheese Cake - Rainbow
Now the Fun begins - From Second picture on right as you view it to the center
Cheesecake

Cheesecake


NOTE 1: My oven was obviously either newer or more efficient that the parent site for this recipe! – So I would advise caution and let it bake for 1hr and 30mins as opposed to 1hr and 45 minutes. Luckily, the slightly browned top did nothing to mar the taste or the enjoyment of this cake.


NOTE 2: Although the pictures from my source looks PERFECT, a thicker crust might have worked better to keep the cake together while cutting – I may play around with that the next time

NOTE 3:Keep cake refrigerated overnight – Keep water and a paper towel handy while cutting the cake so that you don’t mess up the colors –

NOTE 4: Not a good idea to travel 25 minutes with this cake unless you have a freezer box/pack in which you can transport it – I took this to my baby’s school and the children liked it, I think what they enjoyed most was delving into the gooey mush that they could so easily make it – but I say not too bad for a first attemptJ
Sending this off to Friday Potluck, at Ekat's Kitchen :)


Powered by eRecipe.com

Sunday, September 18, 2011

Strawberry-Ginger-Habanero Preserve With Agave Nectar & Honey

Priyas Preserves

This is one my most exciting ventures in the kitchen – I am still rollicking with Verge’s Cooking with Fruits books. The thing about such books is while we want to remain completely true to the recipe, they often also kindle creativity and allows your brain to fantasize a new and exciting way of using the fruits, which would in certain ways, be more suitable to one’s own palate – don’t you agree?
The other wonderful realization that dawned on me preserves are the western pachadis – seriously! We make pachadis with just about any fruit- so also does the west make preserves with just about any fruit! I am catching myself doing what I do too often – trying to find parallel between cultures so we can find a point of intersection – I firmly hold the belief that food brings people together like nothing else can!
I also need to share a short story behind making this. We had gone for a vacation to Bermuda and for those do not know, Bermuda is quite famous for their Gombeys folk dance comprising of African, Native American for dance and British influences in the music. And the hot& sweet preserves are a huge tourist attraction and of course being the gourmands that we are, we bought a six pack back home one more flavorful than the other, the spice making our hair stand on edge, while the sweet overtones try to soften the explosion that is to follow as the last flavor of the habanero, jalapeno and Serrano peppers emerge in full throttle ☺ We had it on crackers, on bread, with chapatis and with English muffins – they were Da bomb!
Having said that, I needed to try and recreate something similar if not the same before I forgot the flavors! They do not provide their recipes on the label! So if you go to Bermuda anytime, do not miss out on the Gombey preserves!

Here is my recipe for this preserve
Prep time 5-10 minutes
Cooking time – 10-15 min
SGH PReserve

Ingredients
1lb box of fresh strawberries
1 habanero pepper
1-inch sized ginger (about 2tbsp grated)
½ cup Agave nectar
½ cup Orange Blossom Honey
1 packet pectin (roughly 1tbsp)
Priyas Preserve

Preparation
Wash strawberries thoroughly and cut the heads off
Remove the head of the habanero
In a blender, add the strawberries and the habanero and grind – do not use any water
Grate the ginger with the finer side of the grater
Ready a saucepan
Add the puree quickly followed by the honey and agave
Add the grated ginger as well
Let them cook together for about 3-4 minutes
In 1tsp of water, mix the pectin like you would besan to thicken sauce.
Gently dribble it into the pan stirring swiftly as you do it so that you do not encounter knots or white balls of unbroken pectin!
Allow it t thicken some and switch off
Leave overnight
Come morning, find a nice bottle to transfer it into – you will have the perfect consistency of a jam/preserve
The other thing you will notice is the spiciness of the jam from the previous night would have tempered down a bit and will only get you at the very end of the taste – so that part coincided with the Gombey preserves we bought and I was quite relieved and happy that I was able to recreate a similar taste without using too many preservatives. Enjoy with dosa, idlis and the usual food mates like bread and pancakes!
pp

Wednesday, September 14, 2011

Spanakopita

Spanakopita

Spanakopita is a greek dish - Spana meaning spinach and kopita as in Pita or pie :) The light phyllo dough is used to make the pie crust and I have tried to remain true to tradition. The only addition to the recipe was I added a few pine nuts
This is a simple, healthy and delicious meal which can be executed in as little as 20 minutes for prep time and and baking time of 20 minutes

Ingredients
2 pack of frozen chopped spinach
1tbsp of pine-nuts
One 4-ounce carton of feta cheese
1 dry red chili for seasoning - if desired
3-4 tsp of olive oil
spana

Spanakopita

Preparation
Remove phyllo dough from freezer and place in fridge 2-3 hrs hours before preparing this dish
Set oven at 400 degrees F
Thaw the spinach and season with chili and salt and cook for a couple of minutes with about a tsp of oil
Throw in your pine nuts (you can sub with walnuts or almonds or avoid nuts if that is preferable)
Keep ready
Prepare your pan by greasing the bottom with olive oil
Roll out the phyllo dough and place 6-8 sheets dribbling scant amounts of oil every two layers to keep it from drying out- you could also keep a damp towel and dab the dough if you think it is drying out
Next layer with the spinach, followed by the feta cheese
Add 6-8 more layers of dough again dampening them with oil/damp cloth
Bake for about 15-20 mins depending on the efficiency of your oven
Remove when the phyllo dough is crisp and golden brown
Enjoy with a side salad :)

Spanakopita3


Kanda Bajjis (Onion Fritters)

kbs

This is the fourth post for Blog Hop Wednesday started by Radhika of Tickling Palates– This time, I was paired with Bhagyashri of Taste Buds – She has a number of interesting recipes, but since I was shortchanged for time, so I picked a simple one although it was a fried one :( -AI am sorry to break the healthy spree of recipes that I’ve been posting with this universal favorite fried weakness! The dish is Kanda Bajji (pakoras or fritters) and here is the recipe with a few personal tweaks.

Ingredients
Besan 1 cup
2tbsp rice flour
1 big red onion
½tsp turmeric
3-4 Green chilies
Salt
A pinch of asafetida
Curry leaves
Grated ginger 1tbsp
Cilantro
Oil for frying

Preparation
Dry mix all ingredients except the onions and mix
In a wide pan, heat 1 tsp of oil and gently fry the onion without browning them too much – just to get rid of the raw taste
Add to the bowl and knead
I do not use any water in my mix - The water from the onion and the oil use to lightly fry is is plenty to knead this -
It should basically be some batter holding the onion strips together!
kanda bajjis


Heat the oil to fry and drop small quantities of batter to make the fritters
 Serve as is or with ketchup

kanda bajjis

kanda Bajjis


Sunday, September 11, 2011

Red Rice & Quinoa Ah-pums & Idlis

Attended a wonderful Remembrance day for 9/11 where my daughter sang as part of a choir - a wonderful show of patriotism and unity was presented and what's more parking was free :)
Redrice & Quinoa Ah-pums

Of Up-pums and Ah-pums
After the first one, my daughter declares, “Ma, ah-pums are dosais with an idli in the middle J” I would not have put it that bluntly, but this is true – those who have the ah-pum pans will know that this is indeed true – I have made this for 2 reasons – one because I am hosting the Cooking for seeds and was experimenting with Quinoa and second, this was my humble tribute to Onam (: - I make the distinction by spelling it thus so that we do not confuse it with up-pums, the sweet delicacy that is also popular in the south. – I have made those as well and have yet to blog them :(
But I am putting few pictures of the up-pums as well
Quinoa Idlis

Here is my recipe
Ingredients
2 cups of Red Rice flour
½ Cup of Quinoa flakes
½ cup of Urad Dal
Ah-pums

Preparation
Soak and grind urad dal
Soak the red rice powder in water
Mix both add salt and let it ferment
The beauty about this is you could make your ah-pums as soon as you grind the urad and mix the batters
However, an overnight ferment also yields the softest idlis
Before you are ready to make the crepes or dosais, add the half-cup of Quinoa and mix it in well.
Uppums ahpums


The Up-pum – These I made another day with left over Idlima –or batter of regular idlis – I just added jiggery and cardamom powder to the old idli batter and made them in my awesome up-pum pan

Hope you enjoy the pictures :D

Linking this to the event I am guest hosting - cooking with seeds - Quinoa
Also linking this to Magpie Recipes' Kerala Kitchen

Thursday, September 8, 2011

Black Beans in Guilt-free White Sauce

Creamy Black Bean Dip

Entertaining this weekend? Need a quick, delicious dip to wow your family or friends? Well here is an under-10-minute wonder – And a guilt free white sauce at that! Here is my recipe do the Can-Can
Ingredients
Canned or boiled black beans (1 can or ½ cup) I used a can
1 Can Campbell’s Low Sodium Mushroom soup
½ cup of water
1 Habanero chopped round(optional)
1tbsp olive oil
1-2 cloves of garlic

Creamy black bean dip
Add caption
Preparation
Wash black beans and strain
Heat ½tsp of oil in a saucepan.
Add minced garlic
Add the beans and stir
Now add the can of mushroom soup and rinse the can with half cup of water and add to the pan
Allow the black beans to simmer in the sauce for 2-3 minutes or until you see it bubble
Remove from flame
In a separate pan, add about 1tsp of olive oil and add the chopped habanero and allow it cook for a minute in the oil
Creamy Blackbean dip
Note: if you do not want too spicy, remove the habanero and just dribble the oil into the dip
Some like it HOT – for you (and me) we garnish the dip with the habanero and serve with chips or soft tortilla
Hint: This can be served hot or cold – make and refrigerate for an hour or two before serving should you choose to serve it cold. This would also soften the tingle of the habanero! Decorate with a few sprigs of fresh basil before refrigerating so that its beautiful aromas infuse into the soup! 
Creamy blackbeandip

Adios Amigos! Have a great weekend folks and hope to serve you again early next week!

Tuesday, September 6, 2011

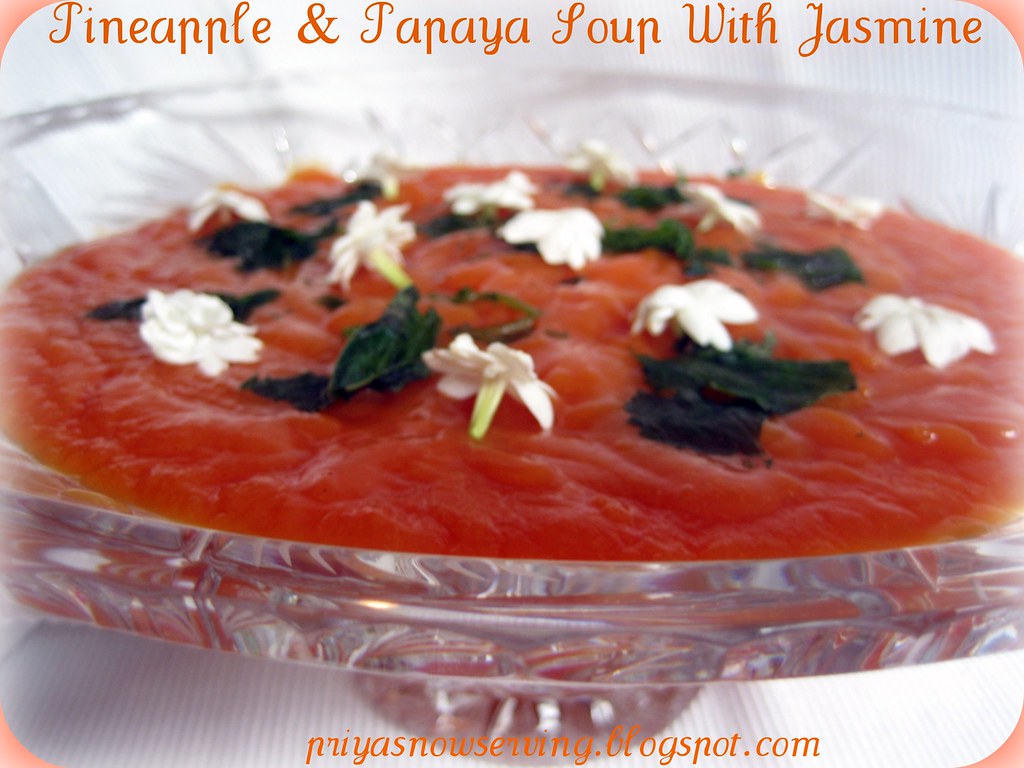
Pineapple & Papaya Soup with Jasmine (Soup D'Ananas et De Papayes au Jasmin)

PP soup

This soup is an adaption of the French chef par excellence, Roger Vergé ‘s Soup de Melon et De Papayes au Jasmin from his book Cooking with Fruits. My dear friend lent me this book to browse – I was totally fascinated at how wonderfully he was able to make a mélange of recipes with fruits.
This is a fantastic soup for all especially I believe my friends from South India who wear jasmines in their hair. The heady, intoxicating fragrance of the flower! I never thought that this could be used in cooking! Believe you me when I say that it infused the most exquisite bouquet to the soup and I felt in 7th heaven at having reproduced, albeit with some changes, this soup delicacy and wowed my family with it… please enjoy the pictures and the recipe and it is one you can certainly try in the south given the abundance of papayas and jasmines and pineapples too.
Picture from the book
6 servings
Preparation 20 minutes
No cooking required
Ingredients
Zest of 1 lemon
Juice of 2 limes
½ Pineapple
1 medium sized papaya
¾ cup sweet wine such as Sauternes
(I subbed dark cherry juice)
1/3cup sugar
1 pinch of salt
36 very white jasmine flowers (you can sub this with few drops of orange blossom water when you are ready to serve)
6 sprigs of fresh mint
White pepper, finely ground (I used black)


Papaya

Pineapple & Papaya
Add caption
Jasmine

Preparation
Grate the lemon for the zest
Peel, deseed and cube papayas
Peel and dice pineapple
Juice the limes
Measure ¾ cup of cherry juice (you can sub with pomegranate or other easier available juices or use sweet wine if you prefer)
Add all the above in a blender with the sugar and the pinch of salt
Pour into a wide bowl and add the jasmines and gently stir them in
Chill for about 2 hours
Strain the soup before serving
Garnish each soup bowl with 2 jasmines and a sprig of mint
Enjoy (:
NOTE: The Jasmine I garnished the soup with was for decorative purposes and perhaps not meant to be eaten :)
Jasmine

Papaya soup 3

ppsoup


Linking this to Taste of Pearl city's Anyone Can Cook, Priya's & Aipis Bookmarked Recipes, My event Fast Food Not Fat Food guest-hosted by Archana of Mad Scientist's Kitchen