Friday, June 29, 2012

Stuffed Spinut Balls - A guest post for the Mad Scientist's Kitchen


This is a guest post I am doing for my sweet friend Archana of The Mad Scientist's Kitchen– I have mentioned before that in my blogging world, I have met some really wonderful women and have actually had a great connection with several of them. Archana is one of those – There seems to be an unspoken understanding of each other’s nature and I am sure had we been in the same town, we’d have been fast friends dropping by each other’s homes tasting our creations J


PLEASE DO stop by Archana's blog to check out the entire post. 

Today I am bringing to you one such recipe that is a good blend spices and ingredients.

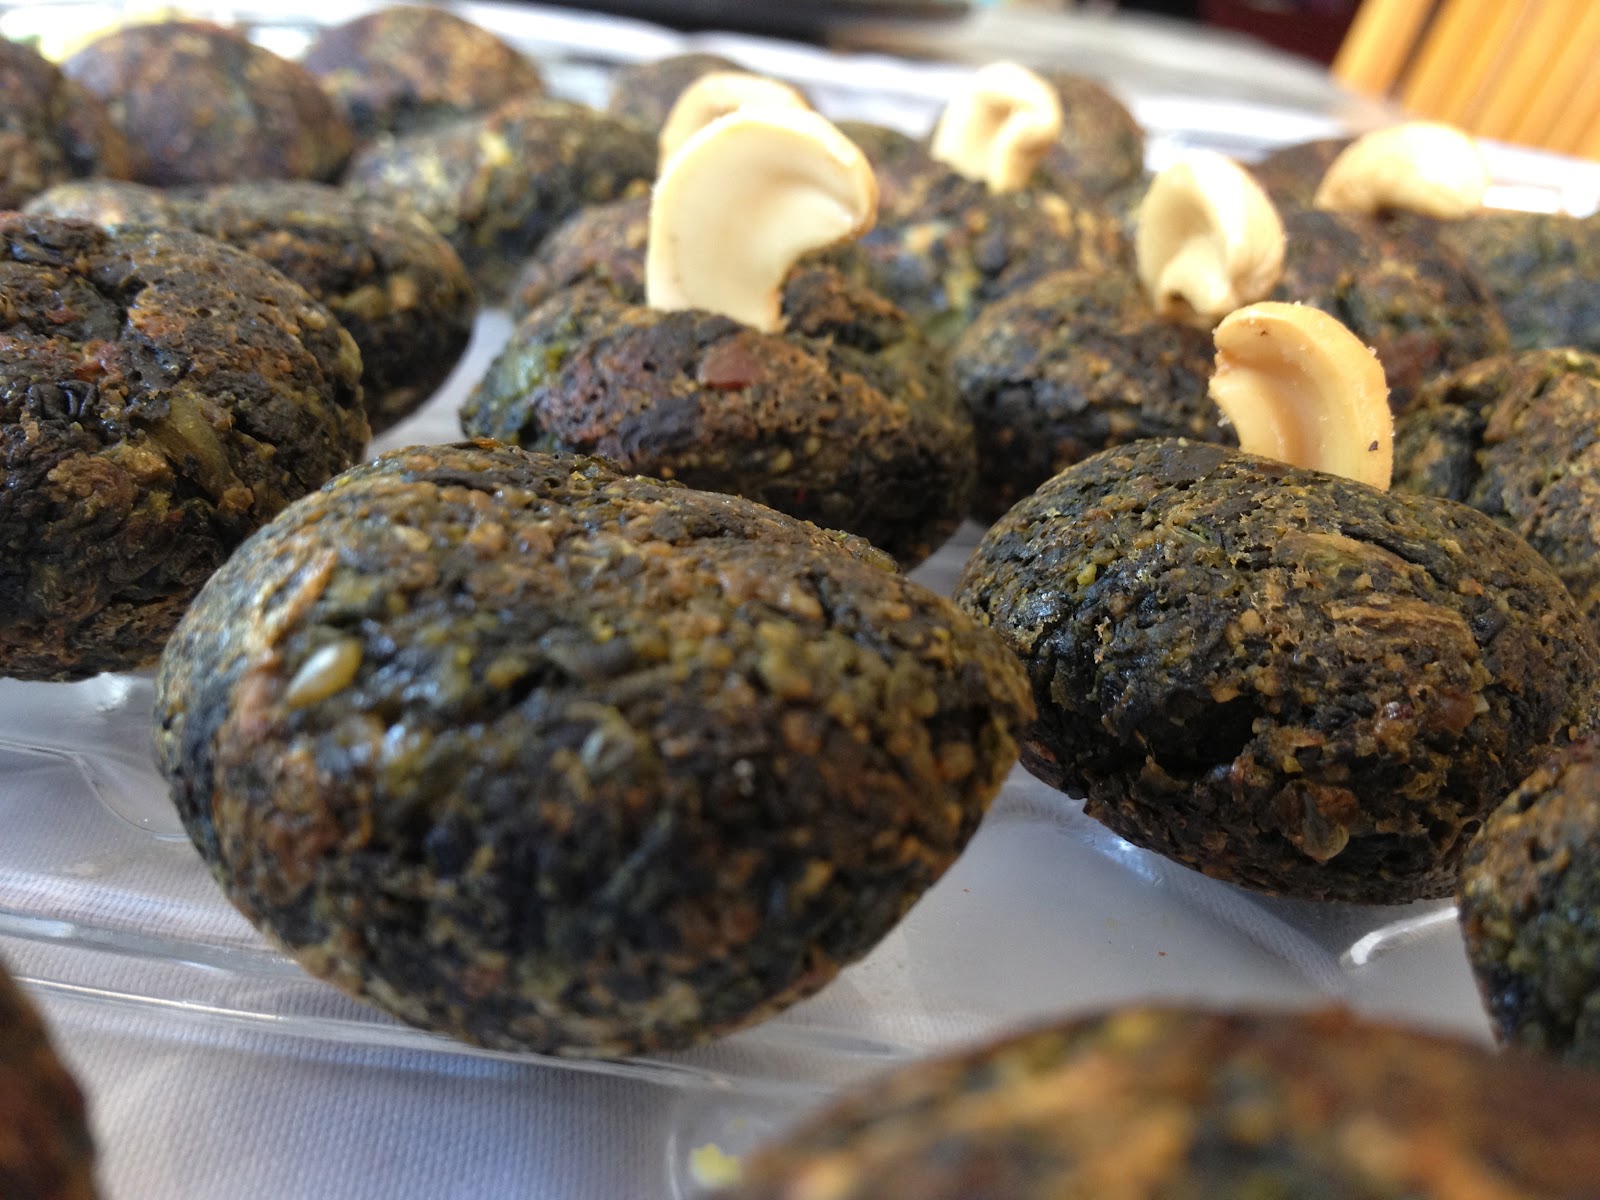
I am calling it Stuffed Spinut Balls. It is an appetizer, but can also be gravy-fied to be an entre like a kofta curry.

Recipe
Makes about 35 lemon sized balls
Prep time: 15-20 min
Cooking time 15-20

ü  2lbs of Spinach
ü  1 cup of peanuts
ü  1tbsp sesame
ü  1tbsp Urad dal
ü  4-8 red chilies
ü  1 cup of freshly grated Romano cheese
ü  ½ cup of herbed cream cheese
ü  1 tsp of olive oil
ü  Olive Oil spray
ü  Dipped Kuzhipaniyaram pan

Just the addition of Romano cheese changes the aroma of the balls giving it an Italian flavor. And the cream cheese sneaks up on you from inside the ball like an unexpected, pleasant surprise.  Again, using olive oil makes a difference.

Preparation

·      I used 3 packs of frozen spinach – if you are using fresh, chop them up fine – Thaw it out and gently squeeze the water out by pressing with a ladle or spoon. For fresh Spinach, cook over stove and remove excess water in a similar way after it cools down.

·      As the spinach is cooking, grind up coarsely the cup of peanuts – I used roasted/salted peanuts for this (Planters)

·      In a pan, use the 1 tsp of olive oil to lightly fry up the chilies, browning with it the urad and sesame seeds.

·      Dry grind this and mix in with the peanuts

·      Now add the spinach to the peanut mix and make it a thick paste of ball-able consistency. Add the required amount of salt to the spinach. Also if you need to use more peanuts if your spinach is still watery, go for it.

·      Keep them on the stove while doing this – this allows the tastes to blend. When the spinach starts sticking to the pan is a good time to switch off the stove and allow it to cool.

·      In a separate plate, grate the Romano with your zester.

·      Keep your cream cheese ready

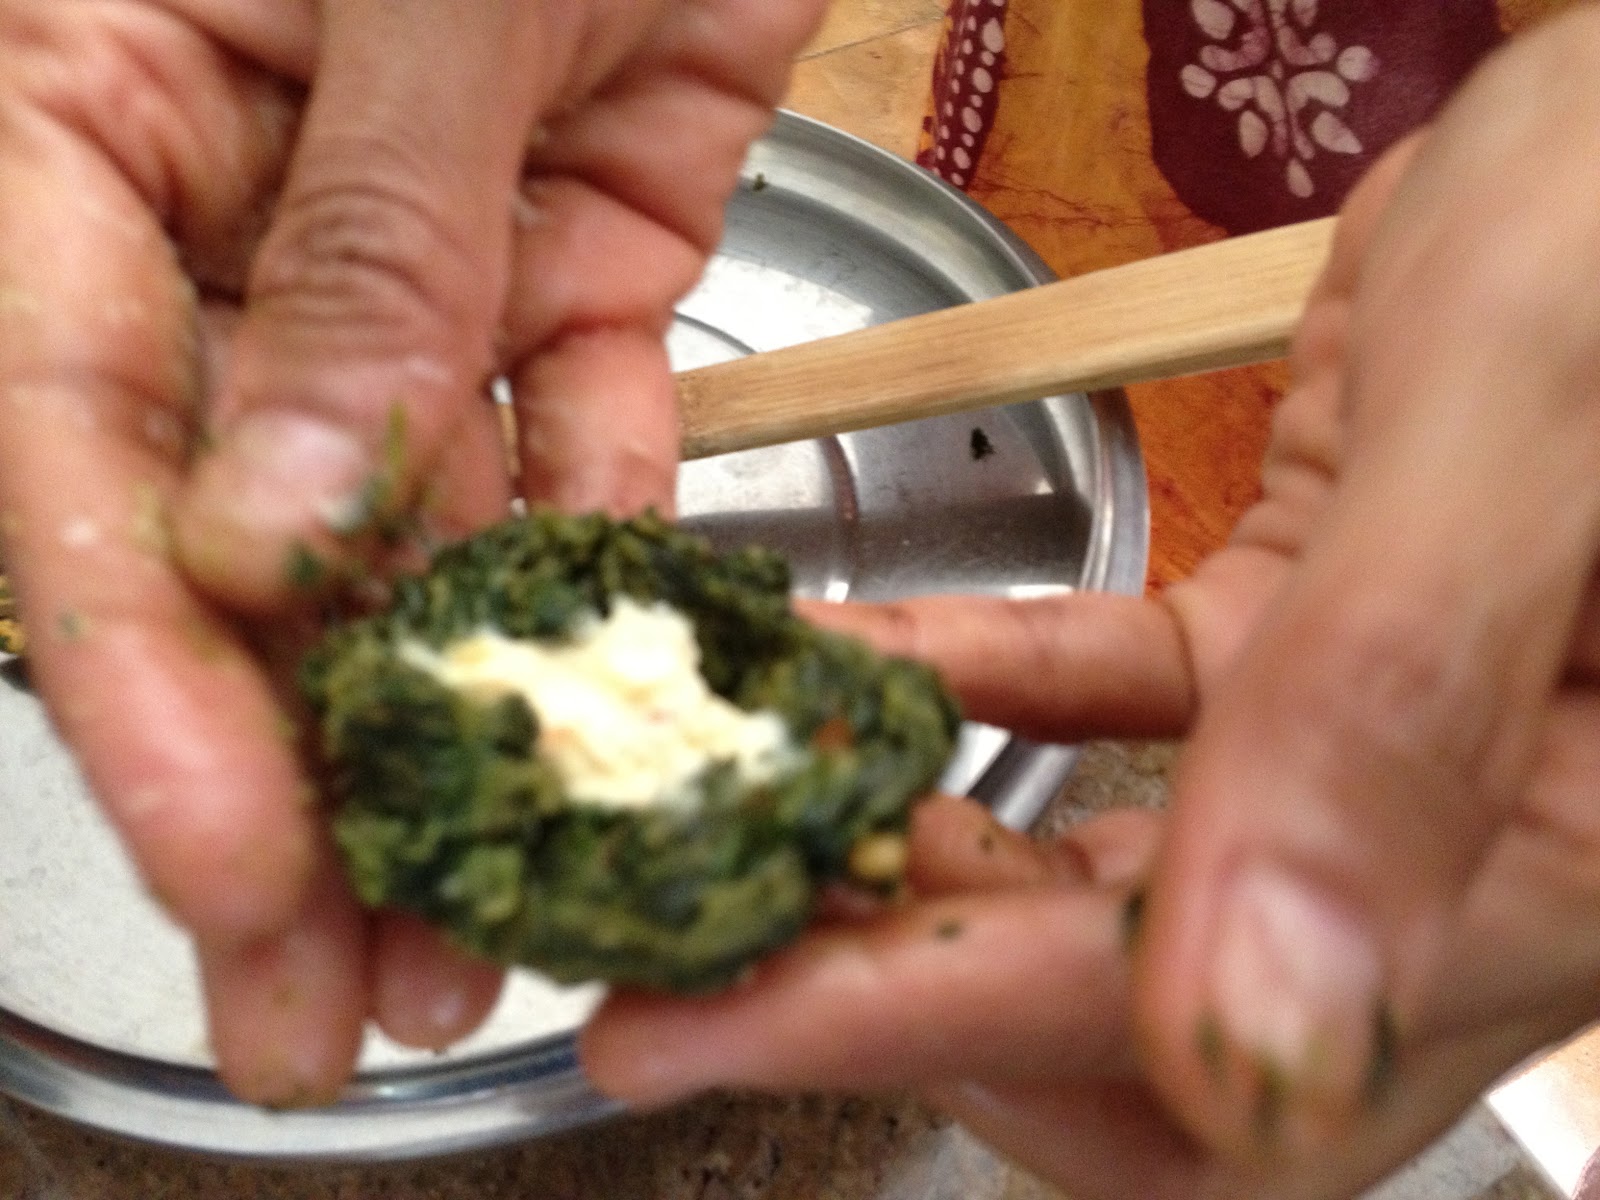
·      Make the balls with the spinach. With your thumbs make a dip in the middle of the ball to add about ½ tsp of cream cheese in it. Fold over it with the spinach and smooth out the ball – repeat process until all the spinach is used up.
·      Roll each in the Romano cheese, as you go along.

·      Spray the dips in the paniyaram pan and put on low heat.  Add the balls and let them cook for about 4-6 min with the lid over the pan.

·      Then open the pan and flip the balls over to allow the topside to cook.

·      They will get a fine crisp coating on top.

·      Set on serving platter and decorate with cashew halves, if desired – I merely did that for some good pictures.
·      


Enjoy this gourmet, healthy and low caloric snack anytime. 


Thanks again Archana for giving me this opportunity to be a guest on your blog. Love, Priya

Saturday, June 16, 2012

Masala Buns


This was an inspiration from Rak's blog and we enjoyed this for dinner - two rolls each and we were quite full, although my son could easily handle a couple more (teenage boys being teenage boys) - I was initially making pizza dough and then had all these "non pizza" veggies that were staring me in the face in the fridge- made an on the spot decision to make these instead - I had seen them on Rak's blog when she first posted them and had forgotten about it.
Easy to whip up and quite a treat for any occasion. Here is my version of this.

For the Bread
2 cups of flour  - I used equal proportions of wheat and all purpose flours
tbsp dry fast acting yeast
3/4 cup + warm water
1tsp of salt
2tsp olive oil

For the Stuffing
Any veggies you like and want to stuff with  - Make a curry out of it as spicy or bland as you desire. I made mine with
1 large onions,
2 cups of minced mushrooms,
2 sweet potatoes, 2 potatoes,
1 cup of finely chopped red and yellow bell peppers
green chilies - per taste
1tsp turmeric
1tbsp sambar powder
Curry leaves and cilantro finely chopped
1tbsp olive oil

Boil the potatoes, and add the rest of the ingredients into hot oil in a pan. stir fry them before add the mushed potatoes in. Allow them to cook together making sure they remain sort of dry -as in do not add any extra water - Allow for all the water from the veggies to evaporate. add your salt and spiced and simmer together for 2-4 minutes and remove from flame.  Cool it down

Pizza dough

In a bowl, dry mix salt and flour
In a mixing bowl, add 1/4 cup of warm water to the yeast and allow it to rise for 5 -10 minutes.
Add to the the flour along with 3/4 cup of warm water -
Knead gently until the batter comes of the sides and you are able to roll it into a ball.
Dust a work surface on your kitchen counter with flour
Get the dough out of the pan and on to the counter and knead for a a couple of minutes only and in the same direction
Work it into a nice round ball and put it back in the bowl and cover with a plastic bag allowing it to rise for about 2 hours
remove from bag after this time - it will have risen well
Remove and render a couple of karate chops to the dough and then make them into balls for stuffing
Make a cup with it and add the stuffing and close much as you would parathas or even kozhakattais.

Bake at 350 for about 20 minutes (varies from oven to oven-so what you are looking for is the browning of the top of the bun).


Serve with love and Enjoy!!!


Wednesday, June 13, 2012

Stuffed Squash Blossom in Braided Bread


Since I am on a bread roll,  (lol) I thought I'd follow up my french bread post with my stuffed and braided bread - the one many of you good friends have given me the wonderful like sign for on FB:)
Keep the same bread recipe as my french bread - except after it rises the first time around
roll it out like a pizza crust. The rest of the recipe follows - this was another of my off the cuff ideas since It is that time of the year again when my veggie garden is profuse with squash blossoms - You may recall my zucchini bajjis from last year. I did not want to use the blossoms in the usual ways that have been recorded on the web. It is really easy and I would love for you to try it - Like all other works of art, this requires patience and that is no biggy for most of my creative friends, right? :)

Here we go!
Identify the male flowers and pick about 10-15.  Wash in gentle water and pat dry with paper towel - allow them to sit in a sunny part of your kitchen until you are ready to work with them

Prepare your bread dough. Let it rise for 2 hours

Ingredients for stuffing the blossoms

1/3 less Fat Philedelphia cream cheese - I used about 6 ounces of the 8 ounce box
Pesto (Mine was homemade and the recipe will be posted soon) about 4 ounces

Mix the two nicely and keep ready

Pick up the dry blossom, cut the back ends off with the stem leaving a small hole. Approach stuffing from the petal end which is wide and convenient - make sure you do not over stuff or push it too far towards the stem side hole.

Hold the flower and with a small spoon insert the cream cheese pesto mix (about 2 tsps). Press the petals close with your fingers. repeat until all flowers are filled.

When the 2 hours are up get the dough out and knead a couple of times . Split into 2 halves. I made a braided bread with one half and a plain loaf with the other.

Roll out the one half like you would pizza dough. Make sure the surface has already been dusted with flour before doing this.

Now place the blossoms gently and closely, facing opposite directions alternately (see picture below) .

Take a sharp knife and cut the sides into strips. The top and bottom corners will be slightly broader. Fold them in first, gently over the blossom. Then braid the rest of the strips, as shown in the picture.

Bake at 350 degrees or until brown at the top.
I hope you'll enjoy this!

Serve it hot :)

Stay tuned for my Masala Buns - which is the next recipe on my blog!


Homemade Pesto


I have truly made a better braid than this, but hey...


Tuesday, June 12, 2012

The Perfect French Bread


The first one took less that 5 minutes to be polished off - I kid you not!

When I scoured the web for a good recipe, little did I know I was going to end up following a you tube demo of the least complicated recipe out there - The only thing you need to do if you are following him, is cut back on the salt!!!! either he made a mistake when he said 1tbsp instead of 1 tsp or he just likes his bread way too salty. Otherwise, the recipe was first rate - no fuss and most importantly NO oil - he saves the butter for the end.

Anyway, your search for a fabulous loaf of french bread end right here mes amies.

Ingredients
4 cups of flour (I used Pillsbury bread flour) AFP Or half and half of AFP and whole wheat - I guess you can play around with this :)
1 tbsp fast acting yeast
1 cup + warm water
1tsp of salt

Preparation
Mix dry ingredients flour and salt together in a bowl.
Mix the yeast in about 1/2 cup of warm water stir it in and pour into the flour
Add 1/2 more cup of warm water and nix until the dough is coming off the sides of the bowl
Transfer on to floured counter surface
Knead for a couple of minutes until you can make a smooth ball
Place back in  bowl and put a plastic grocery bag over it (or saran wrap) and allow it to rise for 2 hours
Dust the works surface with flour
After which,  take the dough, knead a couple of time and cut into 2 equal halves
Roll them out long, flatten with a few karate chops creating a dent down the middle
Bring the corners together by pinching
Repeat a couple of times, it is kinda fun to do :)
At this time, preheat oven to 400
The pinched side becomes the bottom as you roll it over
Be sure you have the surface is lightly floured so that the balls are not sticking to them
Now take a sharp regular knife and slash a few times down the middle to give it "the look" besides other scientific reasons.
Repeat with the other ball -
Now allow them to sit for another hour or 2 depending on when you need to have it ready
It will rise again, giving that fuller look to the loaf
Turn the temp of the oven to 350
Before placing in the oven, throw about 1/2 cup of water to create a moisture in the oven.
Cook for 35 minutes or until the top is brown

Remove and serve hot with olive oil, freshly grated romano or parmesan and a hint garlic. Or just put a tsp of butter and watch it melt into the loaf as you take your first bite :)

This bread is incredibly soft on the inside and has an interesting and desired crusty outer shell -

Enjoy folks - the process is really simple albeit long as are the explanations just so you can get a perfect picture of it -

I back this up with a pictorial now and another Stuffed bread recipe of which there is a sneak peak on my FB page :)


First look

good ole grocery bag - a new trick I learnt :)

Doubled in size

Shaped and Risen

check out the steam 


A Freshly cut piece :) the room was filled with the wonderful smell of warm bread


Not much kneading required to get these fab layers inside

See the butter melting yo!

My happy smile depicted in the cut :)


The back of the bread


Tuesday, June 5, 2012

Blue Ridge Cherry Pie

Can she bake a cherry pie, Billy boy Billy boy,
Can she bake a cherry pie, Charming Billy
She can bake a cherry pie
Quick as a cat can blink her eye.....


HOLD IT RIGHT THERE!!! Have you, composer of this song, ever made a pie crust from scratch??? You would not make such flippant claims, even in jest, if you have. A blink of a cat's eye eh? Yes if it is blinking in slow-mo for about 24 hours -lol!

The biggest challenge of making a pie is without doubt the crust - if you nail that, then the rest is a breeze - And to master my pie-making skills, I once again turn to my lovely patient Canadian friend Stephanie of Joys of Baking. I followed her like the Lamb did Mary (ah- there is another rhyme I've inadvertently alluded to) you cannot but make a perfect pie crust. So my advice - follow this link for pie crust lessons.

What I claim to be mine is the filling -

In my Cherry kachal post, I told you about our wonderful cherry picking adventure, right? This was the first recipe I made with them - I have another very informative post on how to freeze cherries properly coming up soon.

What sets a pie apart from any other, other than a deliciously flaky crust? The filling, of course.
What a turn on it is to pick your own fruits, clean them, pit them and use them in a recipe - I made it my own by adding two ingredients that all my Indian friends would approve of and applaud :) Ginger and Cardamom. I ditched the same old Cinnamon and went for the exotic, the tingling spicy and what was pronounced a fabulous pie - I had taken this to a friends home and there was this gent there who was not a big cherry anything fan - I think he just got converted that evening :) I quote loosely "best pie ever" and went for seconds. That mes amies is a good compliment, n'est pas?

Here is the recipe for the pie filling
3lbs or 5-6 cups of pitted fresh cherries
3/4 cup of sugar
2tbsp corn starch
2 tbsp fresh squeezed lemon juice
1tbsp powdered cardamom
1 tbsp ginger powser

Preparation

In a heavy bottomed pan, throw in all the ingredients and cook for about 3minutes only until the ingredients come together.
Allow to cool down completely
Pour into the pie crust spreading evenly
Oven set to 350 and baked for 34-45 minutes

Follow Stephanie's baking directions please - Link here

Here is my pie crust, pie filling and finished pie pictorial - enjoy y'all. Sorry I did not have the time to take pictures from the start - too preoccupied trying to get the ingredients right :)


Dough is made

cut into 2 halves if making a covered pie

Roll out flat and wrap in saran wrap and refrigerate 

They can be in the fridge for up to a week and in the freezer a lot longer

here are my two wrapped pie halves ready for refrigeration

The pie lady :)

Rolled and transferred on to the greased pan


Note little fingers have poked the pie!!

Following Stephanie's instructions to design the corners

Fixing poke marks

Look at that!

cut the excess crust from the rim

keep refrigerated until ready to roll out and bake


The stars are coming along


My little one helps press the stars

There she is in her Rapunzel outfit :)


The pie is filled

arranging the stars


The oozing that indicates a fully cooked pie :)


The color is off - not enough light :(

This is a good one!

Get your forks and dig in folks